Showing posts with label Tutorials. Show all posts

Tuesday, May 24, 2011

DIY: make antique book decorations

This is my latest obsession: deconstructed antique books. I made these for my home office redo.

Here is a video tutorial (my first!) on how you make these little beauties!
I would love to see if you make these! Don't forget our book discussion starts tomorrow if you want to join in the conversation.

Friday, May 20, 2011

fish braid

Image

I have been loving the fish braid. Free people has a great tutorial on this:

Here is how to make the rainbow one!

Friday, April 22, 2011

DIY Earring Holder

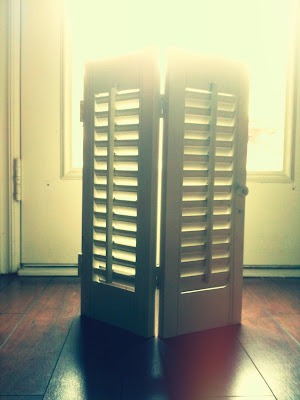
Behold, the vintage shutter. A.K.A.-- earring holder.
Picked this beauty up for about $3 at a local antique dealer. I knew exactly what to do with it when I bought it- earring holder. I kept it as-is with it's well worn scrapes and bruises, that is of course the beauty of buying antique. Although, I made one modification- I hot glued one of the shutters so that it wouldn't flip down when I hung my heavy earrings on it.


My previous "earring organization" was a couple of cardboard jewelry boxes. But sweet earrings like this shouldn't be thrown in a cardboard box! They deserve the royal treatment.


Definitely a fun project to do over the weekend. Your earrings have been waiting for this kind of treatment!

Friday, June 5, 2009

DIY: Drink Umbrellas

I was doing my regular blog perusing through my google reader and came across this lovely tutorial posted by jackaroo love (Fun blog, you gotta check it out!) She posted this lovely tutorial from Martha.  Click here to read all the "how to's" of this project! 
Ah, Martha.  How you inspire us!  If only we all had time to do all your lovely ideas! By the way, has everyone read her book, The Martha Rules? If you are in business for yourself, or you would like to be- it is an absolute MUST READ!!  I picked up a copy on my way to Europe and I couldn't put it down.  Here is a link to the book, and I totally suggest snagging one if you haven't read it already! 


'Stache Bash: downloadable party and tutorial

For some reason at our office we have a "beard thing" going.  Boys and their beards make me smile, and so will this party: 
set Stache Bash Part II

You can see the rest of the post here and check out tutorials on how to make your own ribbons and even a downloadable mustache scoring card.  Thanks again to the lovely Twig and Thistle.  They do their part to make the world a more fun and lovely place!

Tuesday, June 2, 2009

Great Hair Tutorial

Check out this awesome hair tutorial from Cupcakes and Cashmere.  In it, writer Emily shows you how to get awesome loose beachy waves in your hair.  Here is her "how to's" below: hair-tutorial.jpg

Monday, May 25, 2009

Sisal vase wrap


My dear sweet husband brought me home three roses last week and I am a stickler for trying to make his gifts last {Read this post if you haven't already}.  So, I decided to place a few of the ferns that we usually throw out into some old vintage bottles that I had laying around.  Then I spotted a sisal wrapped vase in one of my favorite catalogs  and decided to try to make my own.  Here are the directions friends on how to make your own sisal wrapped vase. 

First: the supplies. Sisal, scissors, and scotch tape. 

Next, wrap the sisal one time around the vase and knot. You will need to leave one end with about 6-8 inches of sisal.  Tape to hold it into place. 
Pull the loose end down to the bottom of the vase and tape. 

Continue to wrap the sisal around the vase. 

Once you have wrapped the sisal around the middle of the vase and it is the desired thickness that you like, tie the end to the bottom piece of sisal that you taped.  
Voila!  A lovely table arrangement for you to enjoy!  Simple and lovely. 

P.S.  The flowers that Greg gave me which inspired the post!

Thursday, April 2, 2009

Pocket Envelope Tutorial

Nothing quite as magical as a good book and nothing makes me happier that a trip to a bookstore or a library. 
Although I love the streamline functionality of my local library I miss the old card catalogs and pocket library cards from the good old days.  Reminisce with me for a minute with this great tutorial from Erinzam.
Tutorial on how to make these pocket envelopes from  Erinzam here

Thursday, February 12, 2009

DIY Flowers


Spotted this post on Ready Made's blog and I thought it was adorable.  The project comes from Still Dottie and you can get directions on how to make this yourself here

Monday, December 15, 2008

Gifts you can make for about a buck!


Everyone is finding ways to scrimp and save this holiday season. Here is a fast and easy idea for a gift you can make for about a dollar, using everyday items from around the house.  This is one of those fabulous gifts that you wouldn't even know was handmade unless someone told you. I don't know about you, but I think handmade is best!

Sweet and Smooth Sugar Body Scrub

What you need:
Olive Oil
Sugar (I like sugar in the raw )
Jar of your choice
Card Stock Paper (60 LB cover)
Color Printer
Glue Stick
Optional: Essential Oils

Directions:
1.) Mix olive oil and sugar together in a small container.  Add a few drops of Essential Oils if you like.   I used a lovely pumpkin fragrance from Bath and Body Works
2.) Print off label.  Click here to snag a sheet of the label we created.  
3.) Add Sweet and Smooth scrub into Jar.
4.) Use a glue stick to affix the label to the jar. 


Friday, April 18, 2008

I (heart) writing on walls part II

Another way I enjoy writing on walls is on my "chalk wall" in my kitchen.  You can buy a quart of Chalk Paint at your local hardware store and turn any surface into your own chalk board.  Michael's Craft Stores sells "Chalk Ink" which is kind of like a chalk marker.  If you've ever wondered how the Chalk boards at Starbucks look oh-so-professional, it's not because your barista is the next Rembrant.  No friends, they have specialized "markers" that look like chalk called chalk ink.  (I know because I asked!) 

Thursday, March 20, 2008

Baby Birds Nest favor

Recently, I threw a baby shower for one of my dear friends.  Here is the "how to" make a baby birds nest party favor. 

1. Cut a 8X8" square of tulle.  Lay flat. 

2.  Shape a handful of Moss Grass in your palm.  You can buy this grass at your local craft store in the section where they sell Raffia. 
3. Place a handful of Cadbury Eggs in the center of the nest. 
4. Using a small hole punch string a ribbon through a note card or name card. 
5. Gather and Tie. Viola!